The Oxford Canal possesses a virtually unique group of "lift" bridges, and here we will look at the remaining bridges, lost sites and the reason they were used in the first place.
Although moveable canal crossings were not that unusual during the development of the canals, the number that survive is relatively small. The only comparable group in the UK is that on the Llangollen Canal in north Wales, whose twelve surviving lift bridges have a very different appearance to their Oxford Canal counterparts, but are essentially of the same counterweighted drawbridge or bascule type.
Bascule bridges have a counterweight which balances the weight of the span (or leaf) about a pivot point. This allows the bridge to be opened and closed with relatively little effort, and the balancing weight can be arranged such that when at rest the bridge is either open (counterweight heavy) or closed (span heavy).
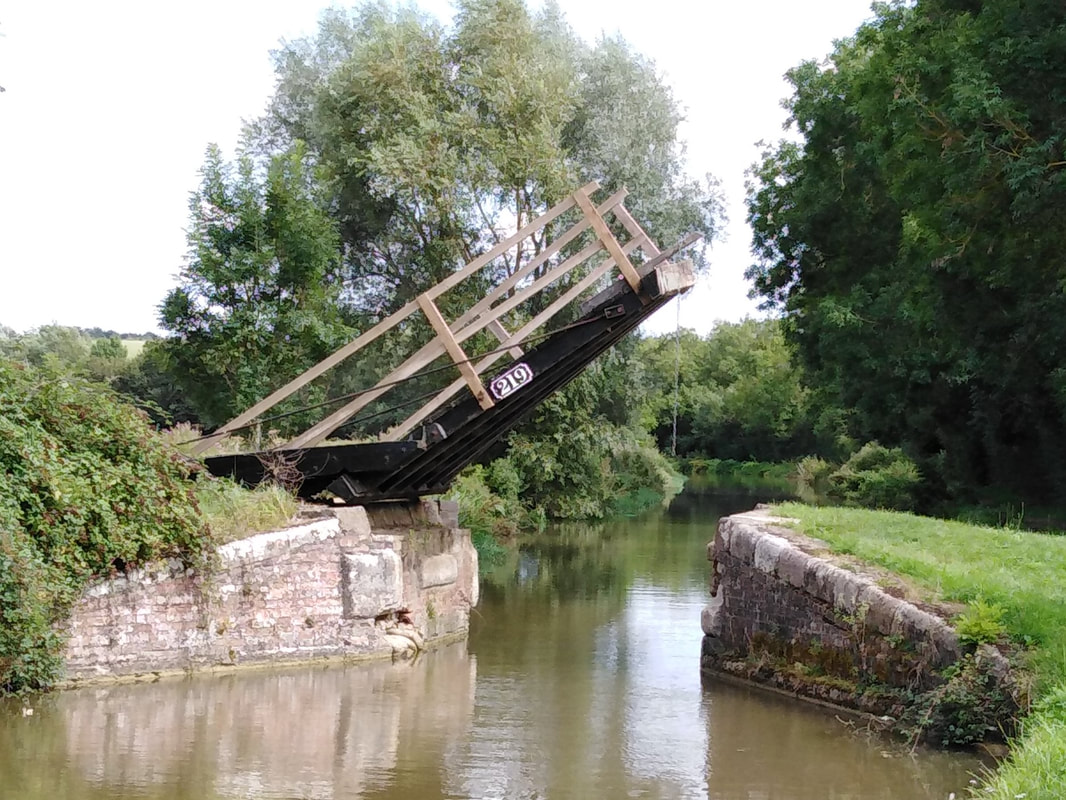
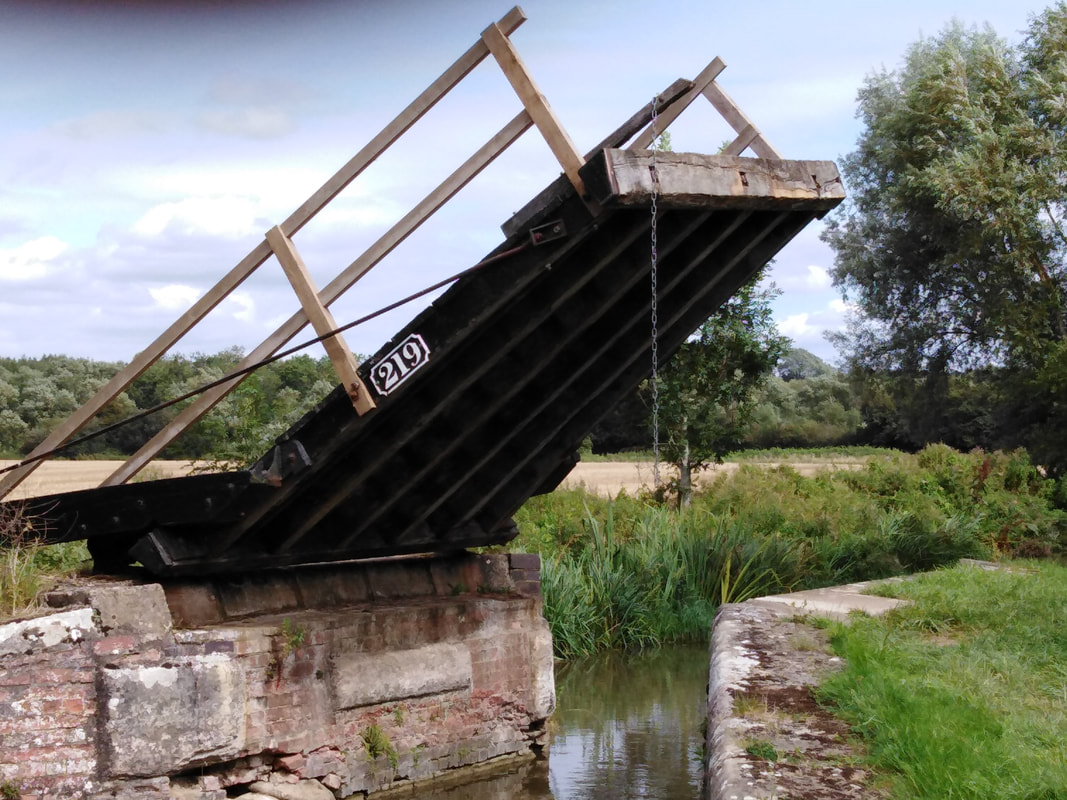
The typical Oxford Canal lift bridge:
The span consists of wooden planking laid across 6 longitudinal wooden beams, which are further strengthened by a number of iron tie rods running between them beneath the deck planking. Two heavy balance beams, set at a raking angle, are attached to the deck beams by iron plates and long iron tie rods run from the upper part of the balance beam to the end of the deck beams. Wooden side rails are sometimes provided.
The underside of the bridge deck with the six longitudinal beams clearly seen.
This bridge has an open resting position and a chain hanging from the end of the deck allows it to be pulled into a closed position from the the near side abutment.
Generally, these lift bridges sit in an open position in rural settings, thus restricting movement of livestock and allowing free passage of narrowboats along the canal. Where they are positioned on busier tracks or byways they often rest in the closed position.
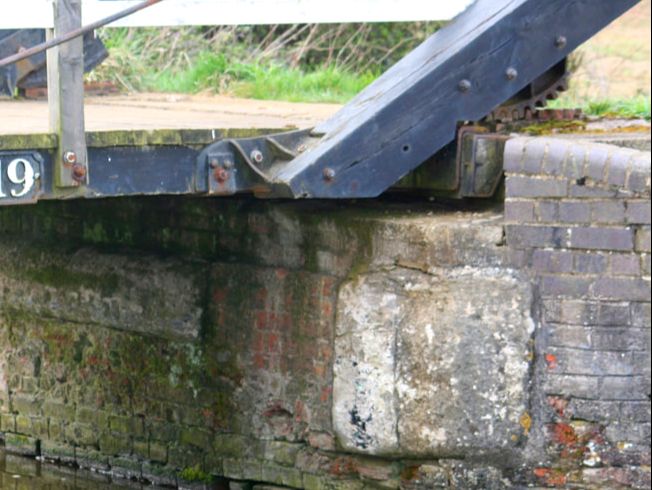
The bridge deck rocks on a cast iron rack and pinion which is bolted to the edge of the abutment and the underside of the balance beam and deck end.
Here we can clearly see the rack and pinion gear along with the plate connecting the balance beam to the bridge deck.
Note also the recess which allows the deck to sit flush with the upper surface of the abutment when in the closed position.
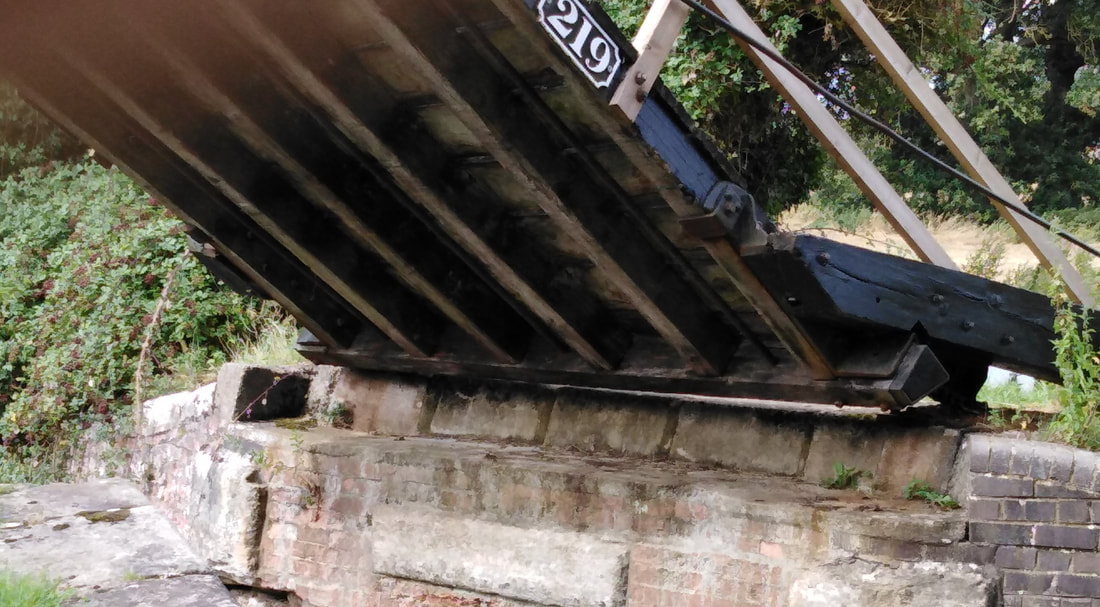
Another view of the underside of the bridge deck. The three iron tie rods running parallel to the deck supporting beams are seen, together with the iron connecting rod from the balance beam to the far deck structure.

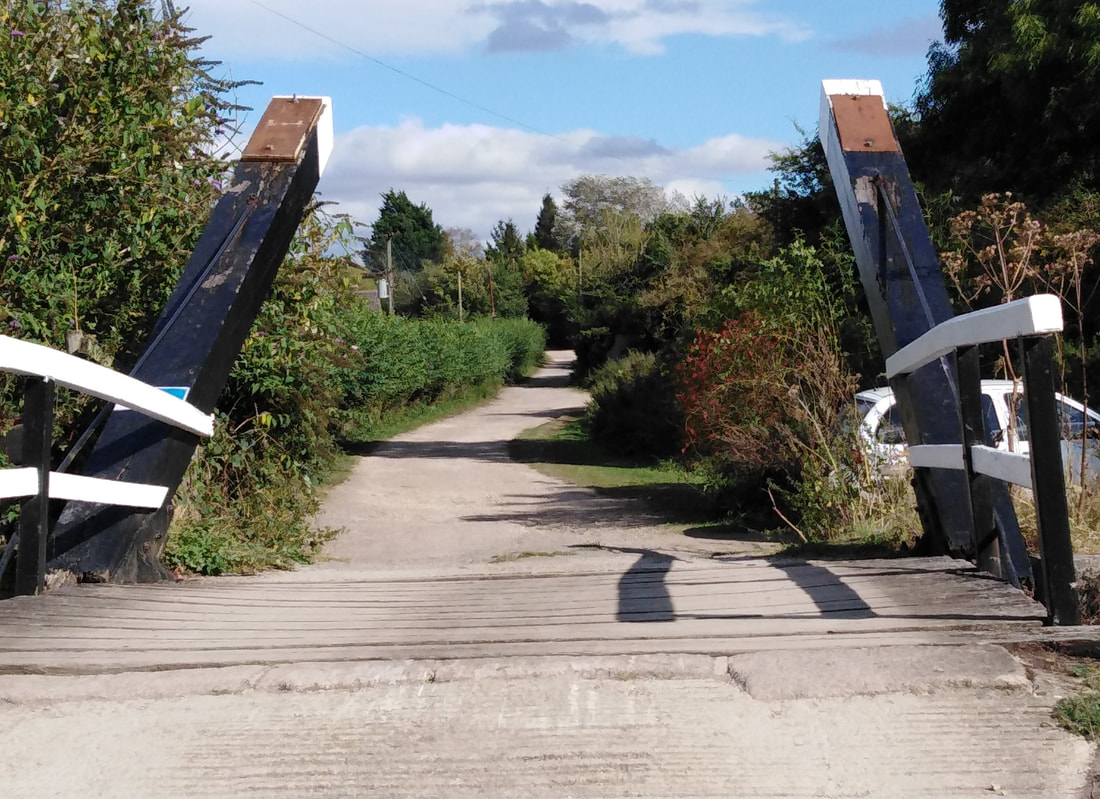
Shipton Lift Bridge (219) in 2019. Image: Tony Prothero/ CCAG archive.
|
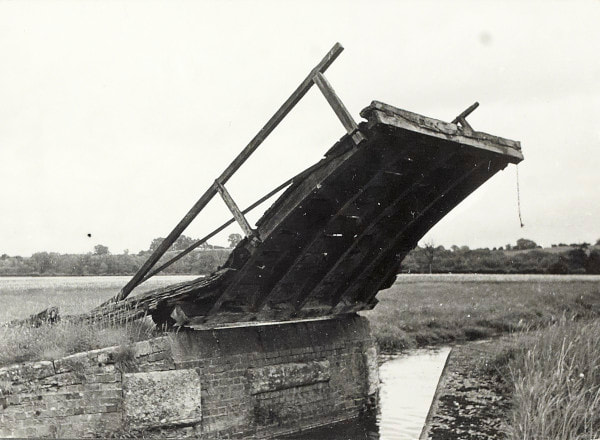
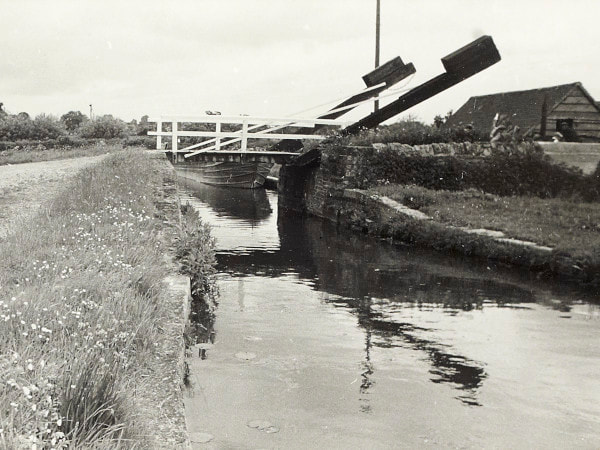
Shipton Lift Bridge (219) in 1953.
Image supplied by National Waterways Archive, Canal and River Trust (BW 200/1/72/7 (3))
|
The changing appearance of Shipton Lift Bridge is well illustrated by the above images. The wooden superstructure has obviously been replaced and the brick facing of the abutments has deteriorated.
The other striking change is the openness of the surrounding countryside in the 1950's compared to today.
This is a common finding and presumably reflects a more "eco-friendly" approach taken towards land management in recent times.
The other striking change is the openness of the surrounding countryside in the 1950's compared to today.
This is a common finding and presumably reflects a more "eco-friendly" approach taken towards land management in recent times.
Looking across the closed lift bridge (231) the relationship between the raked balance beams, wooden side rails and iron linking tie rod is clearly seen. Due to its position on a track/minor road, this bridge sits in a closed position and requires a waterways key to unlock it when craft using the canal need to pass.
The bridge deck and "hinge" mechanism sit on abutments that consist of two parts:
- an approach ramp, essentially a sloping earthwork ramp (with or without a prepared surface), that raises the trackway to the crossing level.
- canal-side brickwork and masonry that supports the bridgework and earthworks.
The abutments themselves extend into the canal to decrease the length of bridge span required (see above).
The central part of the abutment facing is commonly of standard brickwork, often in English Bond, but backed by a considerable depth of masonry to give structural integrity.
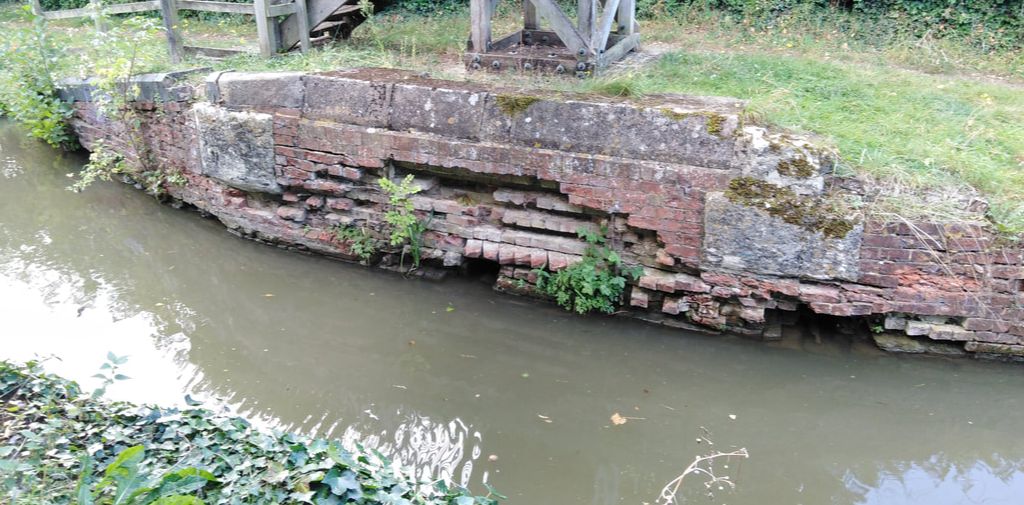
Where the facing brickwork has failed (as left), this usually hidden mass of bricks can become exposed.
The facing brickwork extends into wing wall, which diminish in height away from the bridge, and are angled back towards the canal banks.
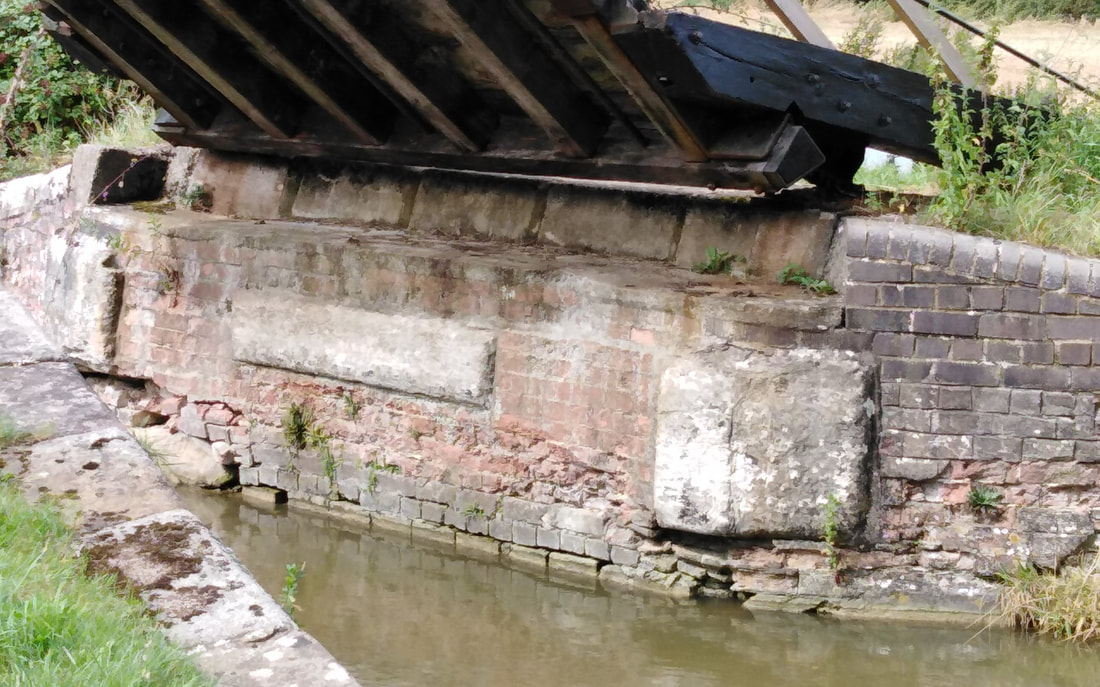
Within the brickwork are embedded two and sometimes three, large stone blocks. These protrude out from the brickwork face and act as fenders to prevent passing boats from damaging the relatively soft bricks. These structures are mirrored on both sides of the canal.
Along the top edge of the central part of the abutments are two recesses. On the "hinge" side the rack and pinion mechanism is attached along the recess edge and the nearside deck edge sits into it when the bridge is closed. On the far side, a narrower recess of similar depth allows the deck nose to sit level with the ground level. These recesses were normally lined with stone.
The tops of the brick facing often had either stone or shaped brick coping.
These relatively simple structures were a cheap alternative to the more substantial fixed bridges of brick or stone, and were commonly used where an accommodation bridge was required. Their original appearance would have been far more "rustic" with the balance beams formed from roughly shaped tree trunks and far more rudimentary side rails. The decks tended to be slightly arched, as compared to todays flat plank decking, and so presumably did not have the under-deck iron strengthening rods. Todays black and white painted finish also appears to be a newer innovation; early photographs of these bridges shows them with what appears to be an untreated raw-wood finish.
(There is a nice series of old photographs of these bridges at www.pictureoxon.com)
Accommodation Bridges
The building of canals during the 18th century saw some of the largest civil engineering projects in the United Kingdom since Roman times.
One of the problems facing the canal builders was obtaining access to land along the planned line of the canal, and resistance from often resentful land-owners. This was overcome by obtaining an Act of Parliament to allow the building of the canal, which gave the builders a form of "compulsory purchase" power. This authority was not absolute, and discussion and arbitration often took place at a local level, especially with wealthy and influential land-owners, as to the exact line the canal would take.
Because the canal tended to follow the "lie of the land" rather than established property boundaries, many estates and farms became divided by the canal cut. The Act of Parliament took this into account, and there was an obligation on the part of the canal builders to re-connect these divided properties by means of appropriately sited and designed bridges. These so called "accommodation bridges" (accommodation in the older sense of agreement) were thus a solution forced on the canal builders, who tended to build them in the simplest and cheapest way possible.
This obligation also extended to maintaining right of way, and even in the 18th century, long established footpaths were protected. Along the Oxford Canal we see several examples of small bridges maintaining the continuity of footpaths, very often in rural settings.
Lift Bridge, Draw Bridge, Swing Bridge.......What Bridge?
Before we look at the the surviving lift bridges and the evidence of the lost lift bridges in more detail, perhaps we should consider what to call them!
Nowadays we refer to the moveable bridges on the Oxford Canal as lift bridges, and this term tends to be widely used for any canal bridge which pivots vertically at one end. Although the Oxford Canal series is one of the best know, these "lift bridges" can also be found on the LLangollen Canal, the Stainforth and Keadby Canal (in Lincolnshire and south Yorkshire) and the Wiltshire and Berkshire Canal amongst others around the UK.
The term "Lift bridge" appears to be one that has only become widely used in relatively recent times. If we look at historical maps of the Oxford canal, not only do we find other terms employed, but an inconsistency and/or interchangeability in the way these terms were applied.
The 6" OS maps (1888 - 1913) for the Oxford Canal shows the known lift bridge sites as:
Narrows ..................................... 2 (bridge already removed - shown but unlabelled)
Draw bridge ............................ 5
Swing bridge ........................... 24
Un-labelled bridge ................ 8
Whereas the 25" OS maps (1892 - 1914) show:
Narrows ..................................... 2
Draw bridge ............................. 6
Swing bridge ........................... 27
Un-labelled bridge.................. 4
the changes being four of the un-labelled bridges being called draw bridges (1) or swing bridges (3), with the remaining naming staying unchanged.
However, the later 1:25,000 OS maps (1951 - 1959) show:
Narrows ................................... 1
Draw bridge ............................ 1
Swing bridge .......................... 16
Un-labelled bridge ............... 12
Not shown .............................. 9
There is nothing to suggest that the bridges themselves have changed (except where they have been removed), but there is an obvious inconsistency in the way they are named.
Even more confusingly, some bridges are given different descriptors at different times. The bridge at Stratfield Brake is a typical example:
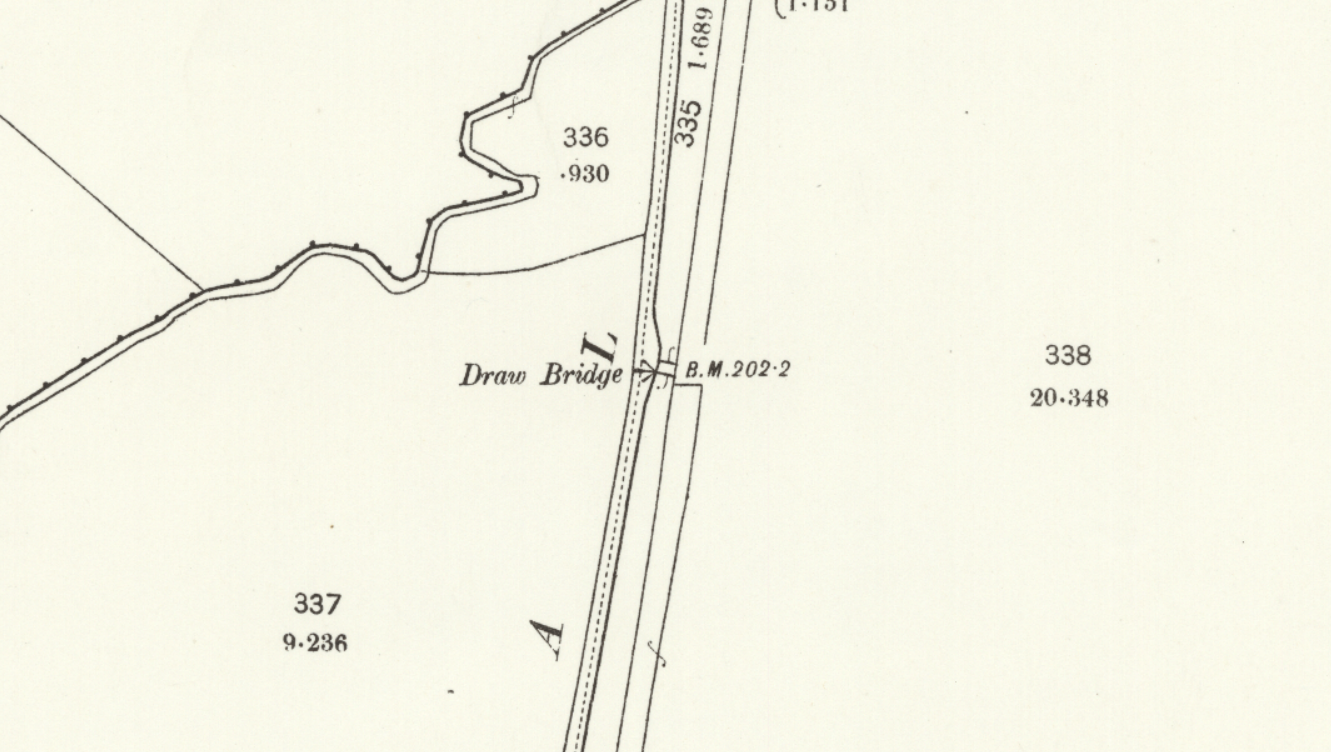
Stratfield Brake Bridge (229): 1899 25" OS Map. The bridge clearly marked as a "Draw Bridge"
(mapping courtesy of maps.nls.uk)
|
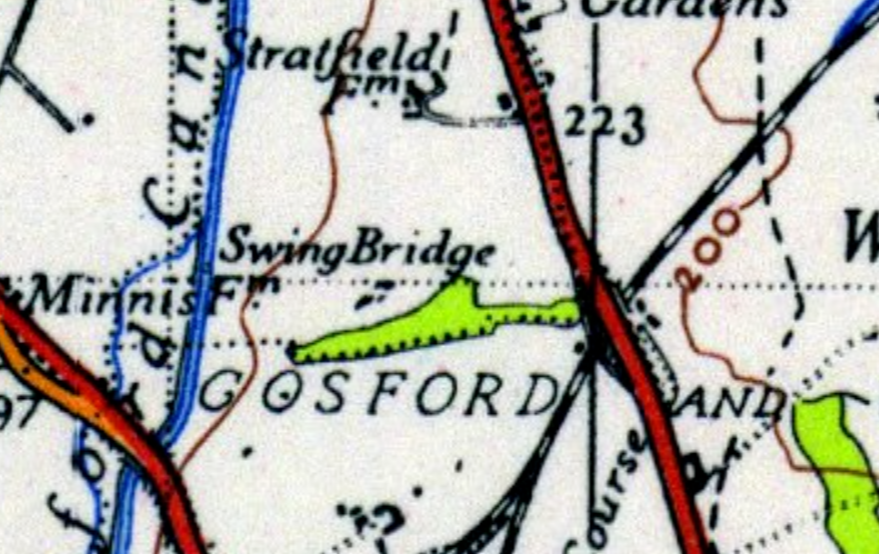
Stratfield Brake Bridge (229): 1920_1940 1:63,000 OS Map. Now the same bridge has become a "Swing Bridge" (mapping courtesy of maps.nls.uk)
|
Stratfield Brake Bridge (229): Present day online OS mapping. The bridge is shown as a footbridge (FT). (Mapping OS data/crown copyright 2021)
|
There is evidence to suggest that the descriptors are geographically distributed. The use of the term " draw bridge" is confined to the most southerly area of lift bridge distribution, from outside of the city of Oxford boundary (from bridge 229 [Stratfield Brake] in the south , to bridge 197 [Somerton] in the north). This evidence is from the older OS maps, and two possibilities are suggested. Either they are cartographic anomalies due to a particular choice of nomenclature by an individual surveyor or map setter, or they represent a true difference in local naming recorded contemporaneously.
So, what lessons should we draw from this?
So, what lessons should we draw from this?
- technically all of these "lift bridges" are bascule bridges, that work in just the same way as Tower Bridge in London, albeit in a far more modest way.
- descriptors and labels have been used with a certain degree of "freedom" during different periods and they can, and do, change over time.
- unless we have incontrovertible proof, documentary sources for naming should be treated with a degree of healthy scepticism.
The Physical Evidence (1): Surviving Lift Bridges
There are twenty working lift bridges along the southern section of the Oxford Canal; the most southerly is St Edwards Lift Bridge [1] (238) in Oxford, and the most northerly is the Boundary Lift Bridge (141) at Claydon.
Of these twenty bridges, seventeen are listed and retain substantial evidence of the original fabric. As a general rule, the upper wooden components of the bridge (deck, side railing and balance beams) tend to have been replaced, whereas the abutments, brick/stone work and iron work (rack and pinion gear, iron plates and iron tie rods) survive to a greater extent.
The following examples show the range of present day lift bridges.
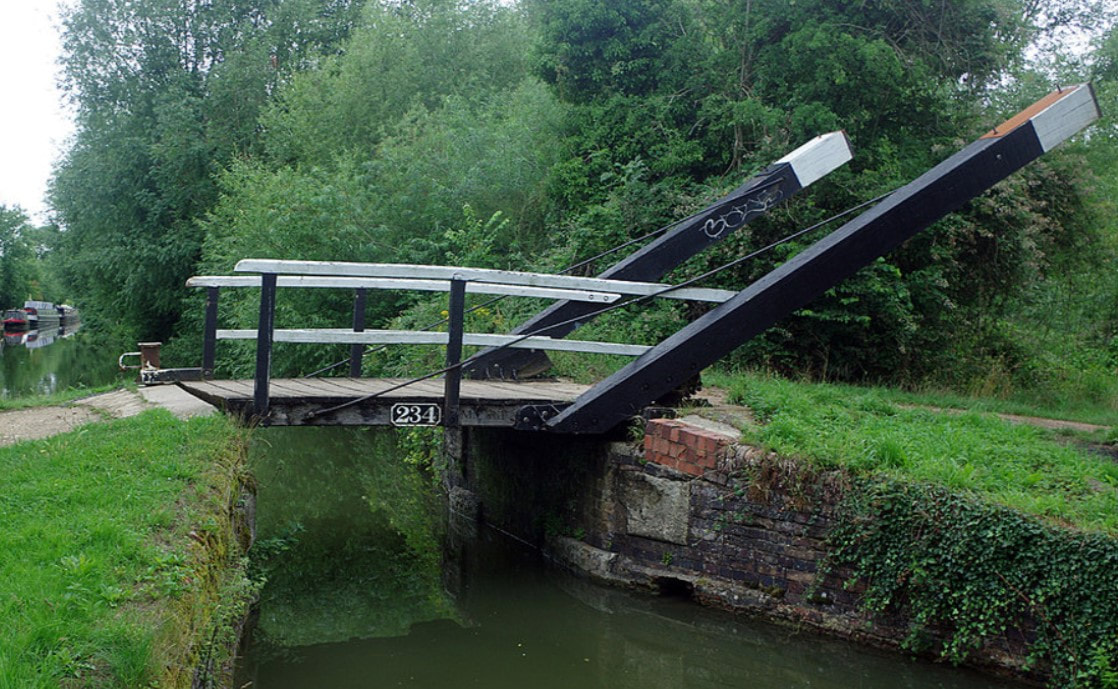 Photo © Stephen McKay (cc-by-sa/2.0)
Perrys Lift Bridge (234), Wolvercote, Oxford [Grade II listed]
A typical Oxford Canal lift bridge. The brick facing of the abutment is substantially original, along with the large "fender" stones. Some replacement of the brickwork along the near upper edge is evident. All of the upper wooden components will have been replaced, but the iron rack and pinion and tie rods are probably original.
As is typical of urban or urban fringe lift bridges, it sits in a closed position at rest (this particular bridge requires a waterways key to open it)
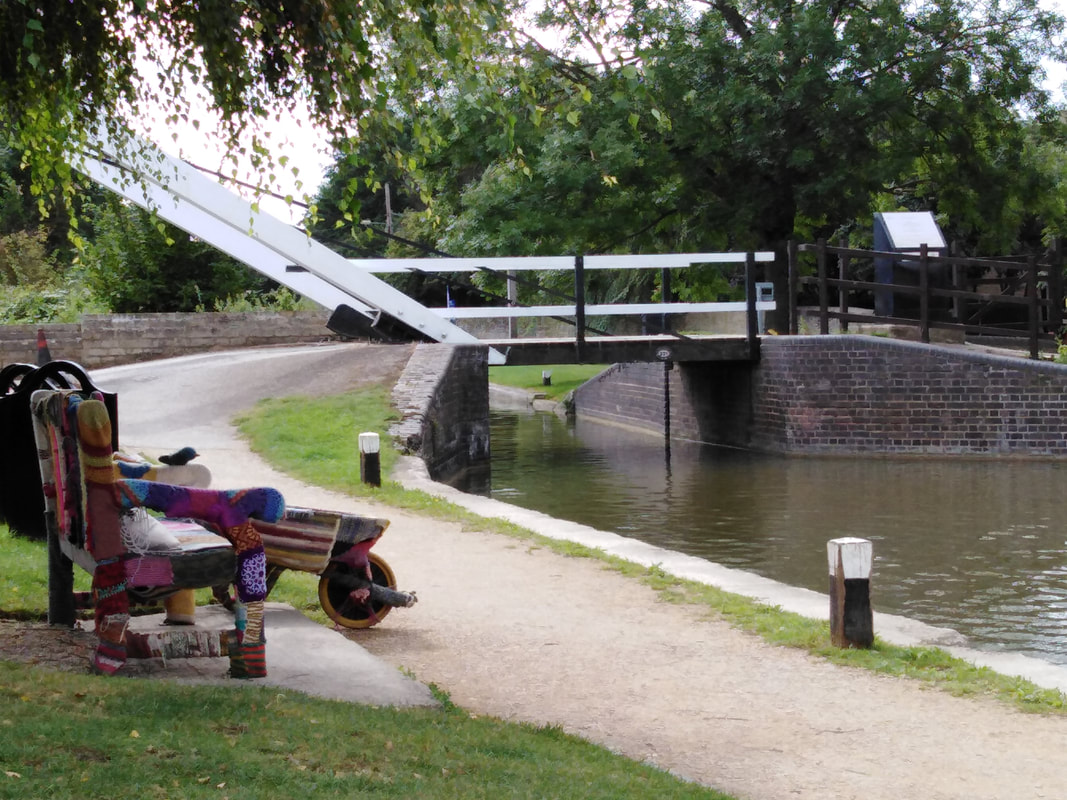 Photo Tony Prothero/ CCAG archive.
Aubreys Lift Bridge (221), Thrupp [Unlisted]
This lift bridge has been substantially rebuilt to accommodate the vehicular traffic across the canal. The deck has been widened and strengthened and the brickwork of the abutment facing rebuilt with modern "Staffordshire Blues".
Although the superficial appearance is that of a traditional lift bridge, this is essentially a modern copy.
 Aubreys Lift Bridge (221) in 1953, before the substantial rebuild. Image supplied by National Waterways Archive, Canal and River Trust (BW200/1/72/6(2))
This older version of the bridge has a similar deck and counterbalance beams to that seen today. However the abutment and brickwork facings have been substantially remodelled with the loss of the more traditional stone "bumpers".
Mill Lift Bridge (205), Lower Heyford [Unlisted]
A bridge with an interesting history!
Originally built as a traditional lift bridge to maintain access to the mill, it was replaced by a sturdier metal framed bridge (probably cast iron) when steam powered traction engines were introduced (sometime after 1850).
This was in turn replaced by the present-day metal lift bridge when the old Mill was developed as domestic accommodation.
So this bridge has seen at least three variations of the typical lift bridge design.
Bridge 205: Phase 1
The original lift bridge, built 1785-7, provided access to the corn mill on the river Cherwell which had been isolated from the village by the building of the canal.
It would have followed the traditional style of construction to provide a cheap and simple canal crossing

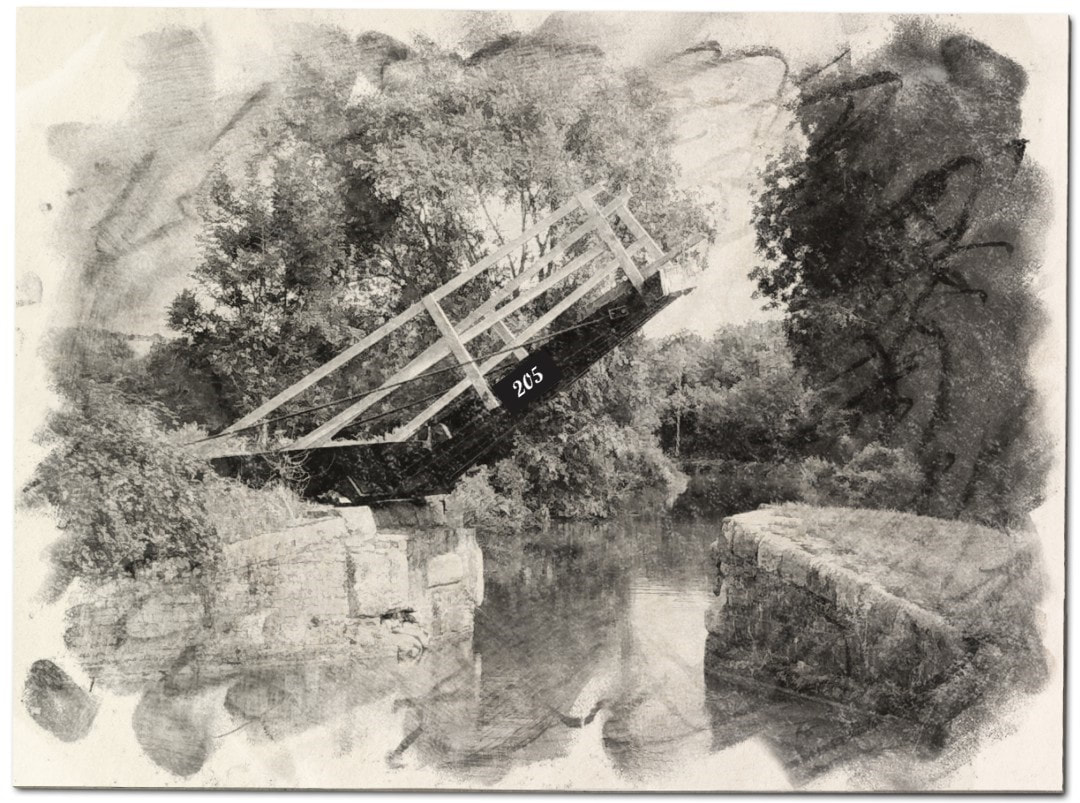
Bridge 205: Phase 2 (Image 1960)
The mid 19th Century metal framed replacement for the original wooden crossing.
The overall structure conforms to the traditional layout, but the major structural components are fabricated from metal.
The span deck is of wooden plank laid across slightly arched longitudinal metal (?cast iron) beams. The arched configuration provides greater weight bearing strength.
The balance beams appear to be steel I-beams and are probably later than the span structure.
Image: Supplied by National Waterways Archive, Canal and River Trust (BW200/1/72/39)
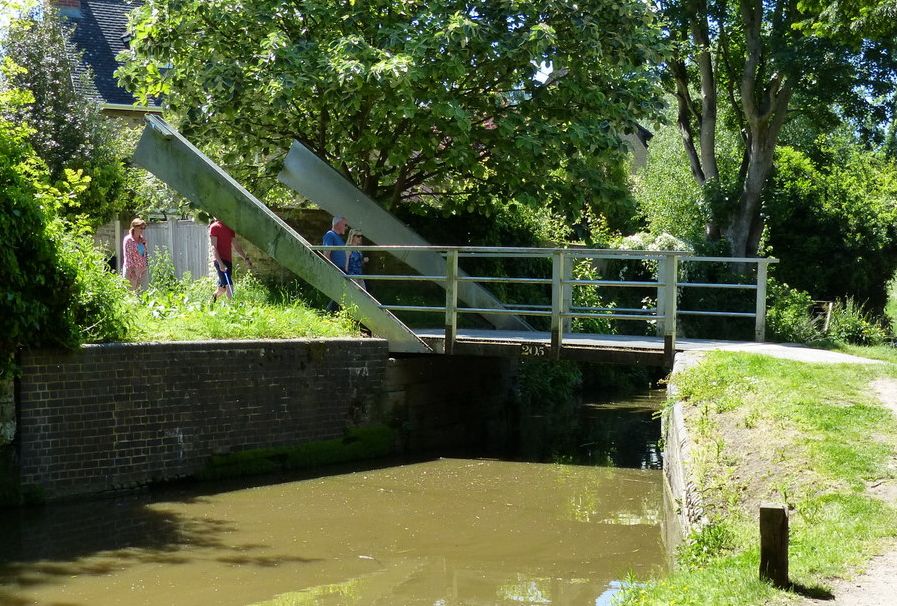
Bridge 205: Phase 3 (Image 2021)
The late 20th Century version of the bridge.
The bridge had been replaced by a light metal structure similar in style to the now removed bridge 162 at Grimsbury Wharf (Banbury).
The bridge has a far more open and lightweight appearance and is operated by an electric motor.
The span deck is now flat rather than arched.
Photo: Tony Prothero/ CCAG Archive
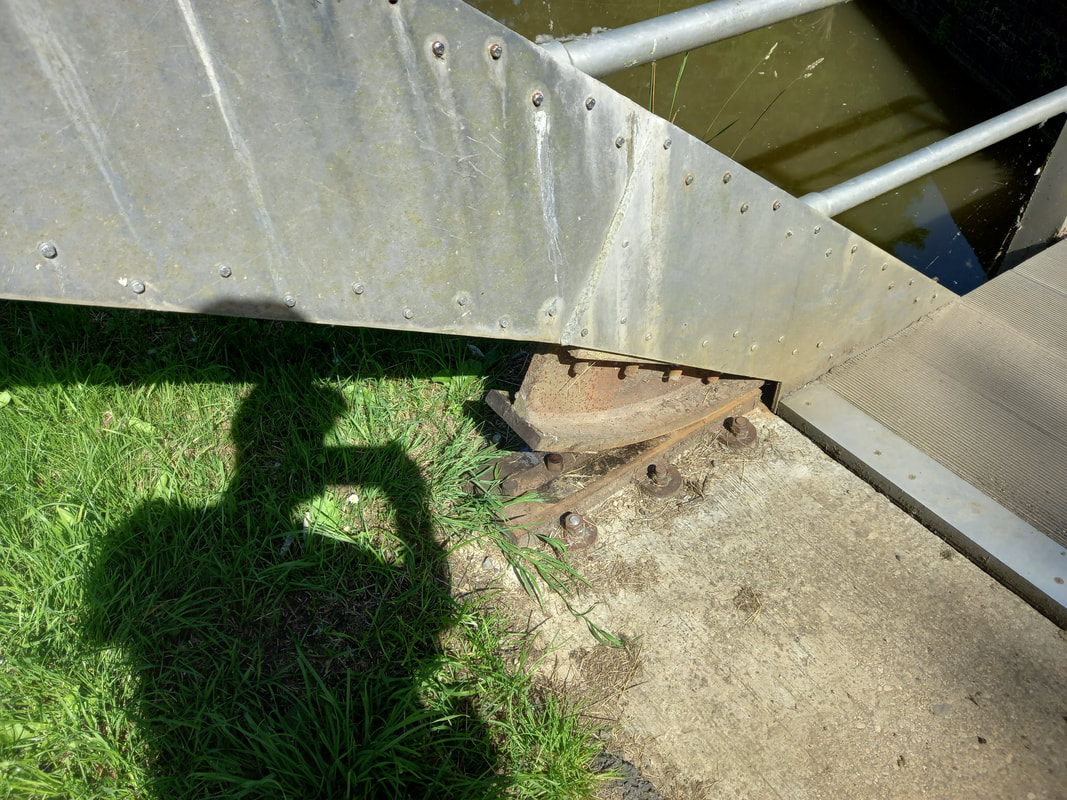
Bridge 205: Detail
The base of the balance beam and modern rack and pinion. Image: Tony Prothero/ CCAG archive. |
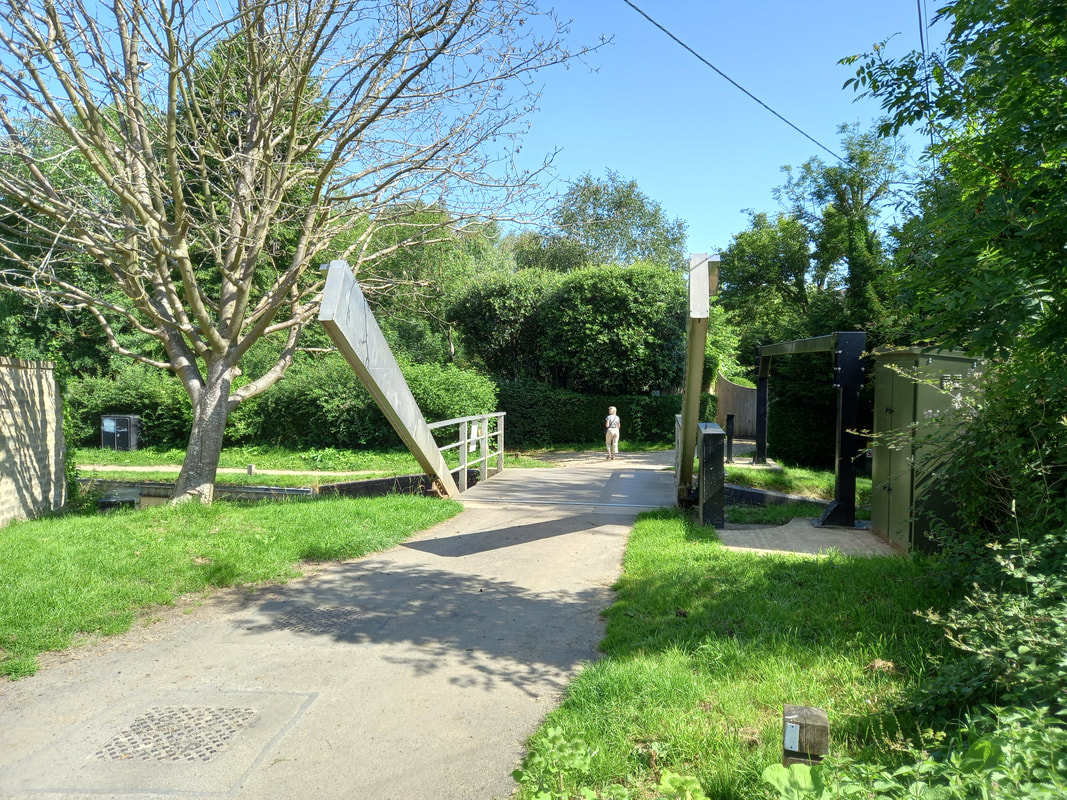
Bridge 205: View across deck
The lightweight framing of the bridge, side rails and balance beams are well seen. Image: Tony Prothero/ CCAG archive. |
The landscape immediately surrounding this bridge demonstrates the cultural impact of waterways, and how people have manipulated them, and been influenced by their location.
There has been a mill on this site since 1545 when the course of the Cherwell was diverted; probably to provide a more dependable water supply to the mill and to allow for better water management on the low lying Cherwell flood plain to the north of the river.
There has been a mill on this site since 1545 when the course of the Cherwell was diverted; probably to provide a more dependable water supply to the mill and to allow for better water management on the low lying Cherwell flood plain to the north of the river.
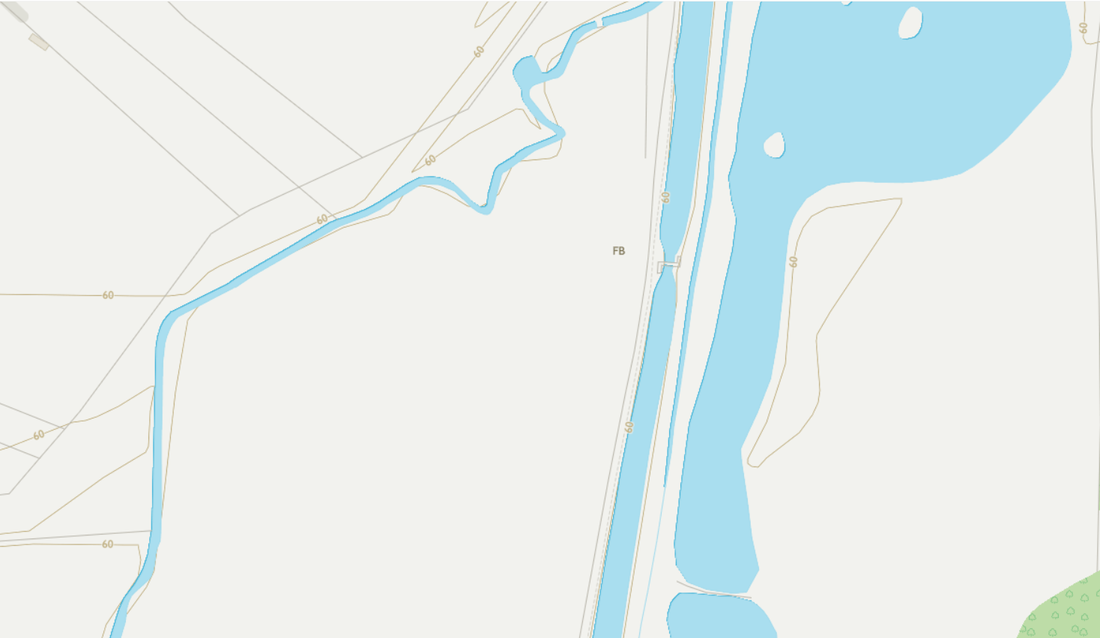
 The position of the mill, Cherwell and Oxford Canal relative to the village of Lower Heyford. Based on 25" to the mile OS map (Published 1922) held by the National Library of Scotland.
The position of the mill on the diverted course of the Cherwell after the building of the canal.
Now isolated from the village of Lower Heyford, bridge 205 provided access from the village on the higher ground to the south to the mill.
Dark Blue: River Cherwell (+ tributaries)
Light Blue: Oxford Canal
Brown: Major Roads
Dotted Brown: Trackway
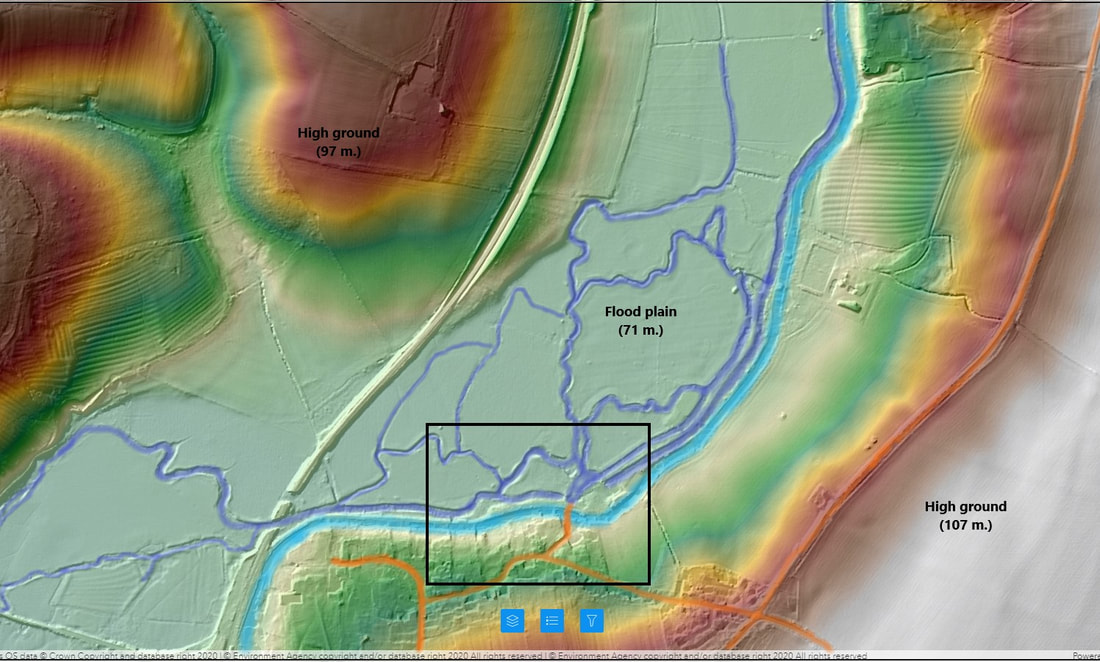 Composite Lidar Image: Lower Heyford and the Cherwell valley. The area enclosed by the black rectangle is shown in the map above.
Contains OS data © Crown Copyright and database right 2020 | © Environment Agency copyright and/or database right 2020 All rights reserved
Composite Lidar Image: Lower Heyford and the Cherwell valley. The area enclosed by the black rectangle is shown in the map above.
Contains OS data © Crown Copyright and database right 2020 | © Environment Agency copyright and/or database right 2020 All rights reserved
The influence of topography and waterways on land usage is clearly seen using lidar imaging. The low lying and flood prone valley floor has never been intensively farmed and remains mainly pastureland or meadow.
The only visible areas of ancient arable farming (ridge and furrow) are seen on the rising valley sides to the north-east and the west.
The river itself has several channels which divide and reconnect, but a major part of it has been diverted to form a managed channel along the eastern edge of the valley that feeds the mill race.
The main population centre (Lower Heyford) has developed on the higher (dryer) ground to the south, and the major roads sit on the high ground above the valley. The more recent railway (Oxford -Birmingham 1852) crosses the valley floor on an embankment before entering a cutting on the slope of its northern flank.
Lift Bridge 164, Banbury Town Centre [Unlisted]
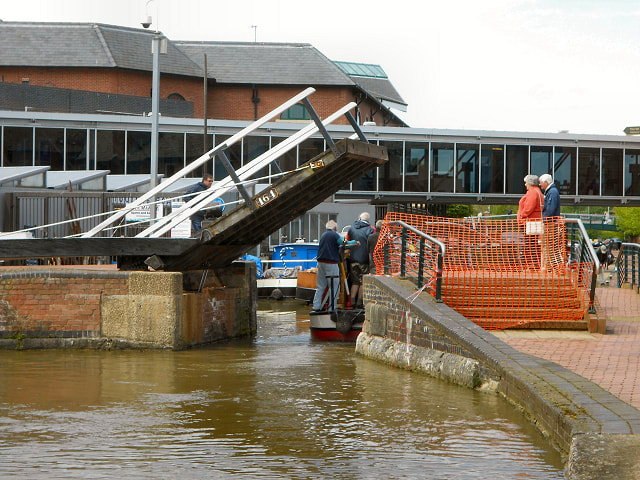 Lift Bridge 164, Banbury Town Centre (1999) Photo © David Dixon (cc-by-sa/2.0)
The "typical" present day appearance of an Oxford Canal lift bridge.
Now sitting within the urban environment of Banbury, adjacent to the Castle Quay Shopping Centre and Tooley's Boatyard which has been preserved as part of Banbury Museum.
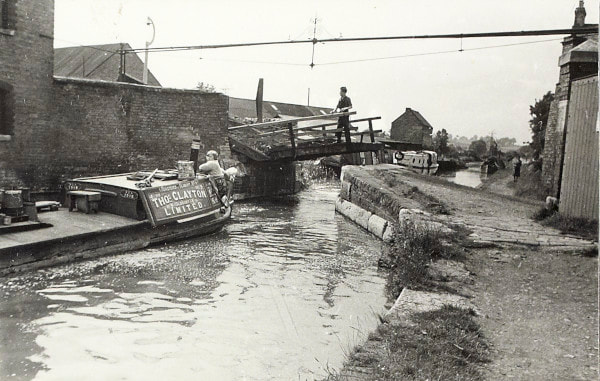 Lift Bridge 164 (1953). Image supplied by National Waterways Archive, Canal and River Trust (BW200/1/72/1(1))
The same bridge 50 years earlier, photographed from almost the same location.
The scale of urban development is striking, with all of the industrial landscape having been obliterated except for the lift bridge.
However even this has been renovated with extensive rebuilding of the approach ramp sand wooden superstructure (the nearside "bumper" stones seem to have survived).
The twenty "surviving" lift bridges are:
Bridge Number |
Name (L/B*) |
Location |
Carrying |
Status |
238 |
St Edwards [1] L/B |
Summertown, Oxford |
Access to school |
Substantially intact |
234 |
Perrys L/B |
Wolvercote, Oxford |
Track (Originally field access) |
Substantially intact |
233 |
Lift Bridge 233 |
Wolvercote, Oxford |
Field access |
Substantially intact |
231 |
Drinkwaters L/B |
Yarnton |
Track (Originally field access) |
Substantially intact |
221 |
Aubreys L/B |
Thrupp |
Track to canal yard |
Modern rebuild |
219 |
Shipton L/B |
N. of Shipton |
Field access |
Substantially intact |
205 |
Mill L/B |
Lower Heyford |
Track to mill |
Modern rebuild |
193 |
Chisnell L/B |
W. of Souldern |
Field access and footpath |
Substantially intact |
189 |
Belchers L/B |
Aynho |
Field access |
Partially rebuilt (2010) |
186 |
Haddons L/B |
Aynho |
Field access |
Substantially intact |
183 |
Coles L/B [1] |
Kings Sutton |
Field access |
Partially rebuilt |
182 |
Coles L/B [2] |
Kings Sutton |
Field access |
Abutments rebuilt |
181 |
Scroobys L/B |
East End |
Field access |
Partial rebuild |
176 |
Stevens L/B [1] |
Twyford |
Field access |
Some repair |
175 |
Stevens L/B [2] |
Twyford |
Field access |
Some repair |
173 |
Lift bridge 173 |
Bodicote |
Field access |
Some repair |
171 |
Foxes L/B |
Banbury |
Field access |
Some repair |
170 |
Haynes L/B |
Banbury |
Field access |
Partially rebuilt |
164 |
Lift bridge 164 |
Banbury |
Footpath (original field access) |
Substantially rebuilt |
141 |
Boundary L/B |
Claydon |
Field access |
Substantial repairs |
* L/B - Lift bridge
Of these twenty bridges:
Of these twenty bridges:
- 3 are modern rebuilds or imitations.
- 6 have been substantially rebuilt (abutment brickwork either replaced completely with new brickwork or concrete blocks).
- 4 show an intermediate level of repair to the brickwork facings and coping.
- 7 are substantially intact with minor repairs (see above list).
- It should be remembered that the upper timber components are without exception replacements, although a few of these may date back to the late 19th century/ early 20th century.
The Physical Evidence (2): "Lost" Lift Bridges
As well as the twenty surviving lift bridges, there are physical remains of seventeen "lost" bridges and documentary evidence or recent knowledge of a further three bridge sites. The structures associated with the lift bridges are very specific and so we can have a high level of confidence about the location of the majority of these "lost" sites.
Generally the physical evidence consists of abutments and brickwork facings +/- some evidence of the approach ramps. In a few sites the rack plates from the deck pivot point survive. There are however, a number of sites where the only evidence of a previous lift bridge is the characteristic narrowing of the canal, which along with historical map evidence is enough to confirm previous lift bridge sites. In at least one site, all physical remains of the bridge have been lost, but map and photographic evidence exists to establish the location of this lost bridge.
Typical site appearances include:
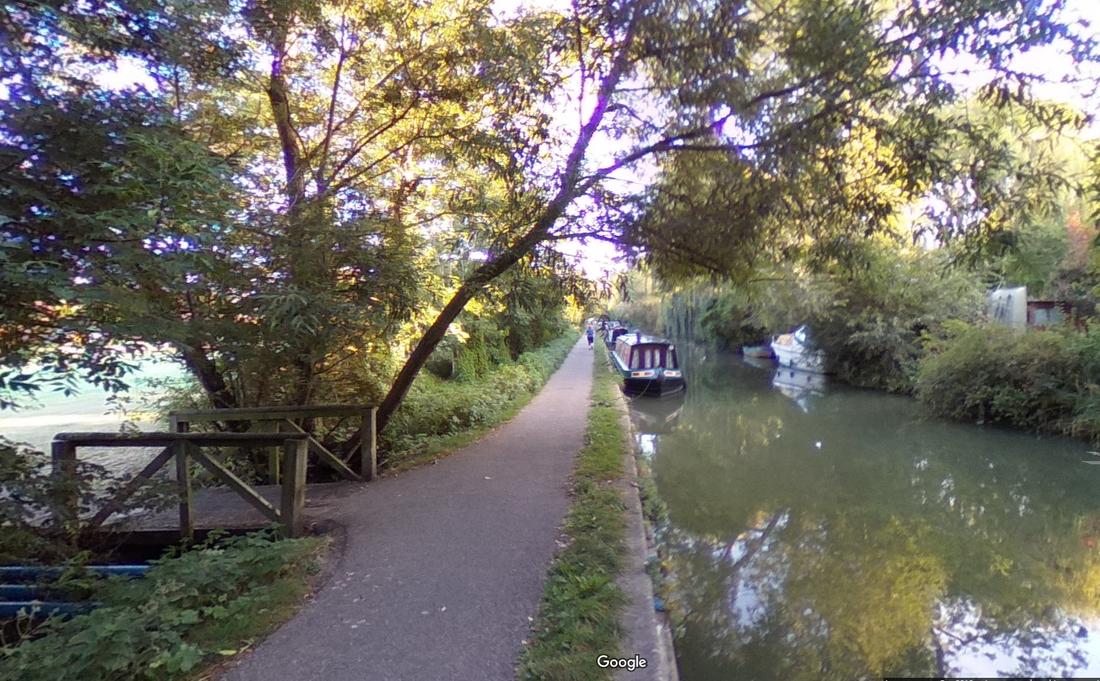
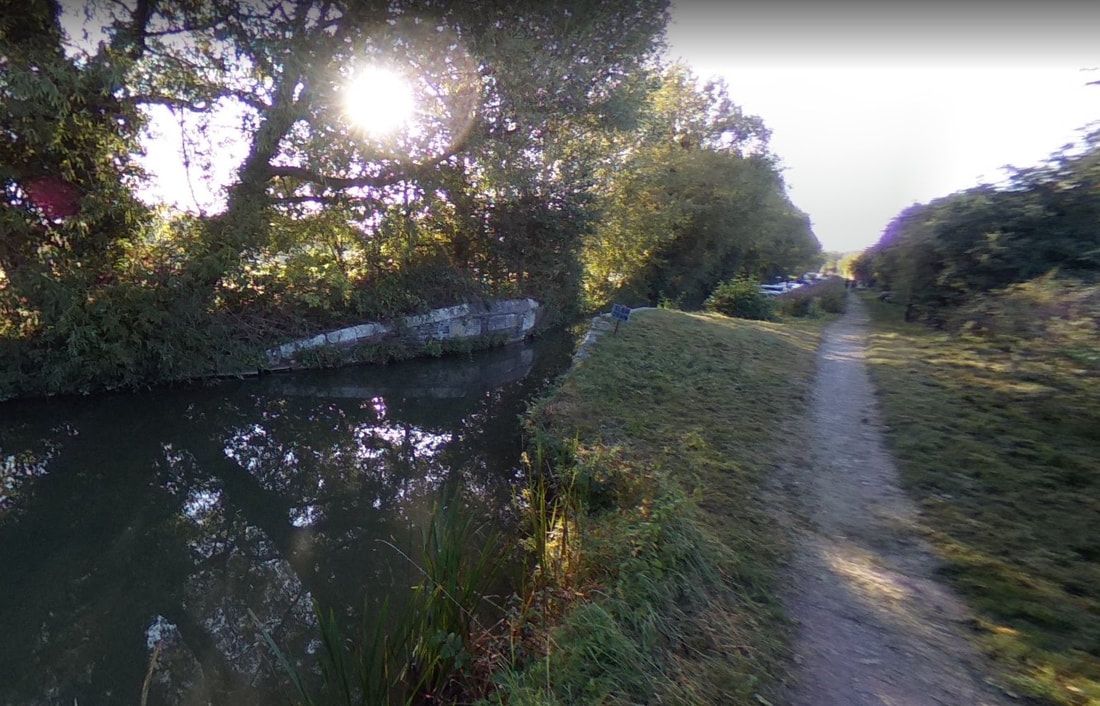 Image: Google Maps
Typical approach ramps and abutments surviving after the wooden superstructure has been removed.
Often the facing brick work and coping survive, sometimes with the rack plates or perhaps only the attaching bolts (always on the off-side).
This is about as good a site you could hope for of a "lost" bridge.

More commonly, nature begins to reclaim the site!
Here the off-side structures are rapidly disappearing under a mass of undergrowth and trees.
Surprisingly, also hidden by this growth, and now completely lost to sight, is a world war II pill box.
Stretches of the Oxford Canal were incorporated into a rapidly constructed defensive stop-line (1940-41) after the evacuation from Dunkirk. This involved the construction of a wide range of structures, many of which, including pill boxes, the bases of removable road blocks on bridges and anti-tank defences can still be discovered along the canal today.
In this semi-urban site, the only clue to the location of a previous lift bridge is the characteristic canal narrowing.
Combined with documentary evidence from historic maps, such sites provide irrefutable evidence of previous lift bridges.
The twenty "lost" lift bridges are:
Bridge Number |
Name |
Location |
Remains/Evidence |
241 |
241 |
Oxford |
No physical evidence. Land access on near side, alignment with St Marys Road on off side. |
239A |
239A |
Oxford, S. of Elizabeth Jennings Way |
Narrows |
239 |
239 |
Oxford, S. of Frenchay Road |
Narrows |
237 |
St. Edwards [2] L/B |
Oxford, Summertown |
Narrows, abutments, brick work, rack plates |
229 |
Stratfield Brake |
Kidlington |
Narrows, abutments, brick work, rack plate bolts. Wooden footbridge. |
225 |
225 |
Kidlington |
Narrows, abutments, brick work |
|
Enslow R/W bridge narrows |
Enslow |
Narrows, some evidence of abutments. |
215 |
Caravan Bridge |
N. of Enslow |
Narrows, nearside abutment |
197 |
Somerton Narrows |
Somerton |
Narrows, abutment and brick work on nearside |
191 |
191 |
W. of Souldern |
Narrows, abutments and brick work |
185 |
Nell Bridge Narrows |
Aynho |
Narrows, abutment and brick work on off side |
184 |
Coles Bridge Narrows |
Kings Sutton |
Narrows, minor evidence of abutment and brick work |
180 |
180 |
Kings Sutton |
Narrows, abutment and brick work on near side |
178 |
178 |
Kings Sutton |
Narrows, abutments and brick work, rack plate bolts on off side |
169 |
Bankside Narrows |
Banbury |
Narrows, rebuilt facings, rack plates on off side |
167 |
Haslemere Way Narrows |
Banbury |
Narrows, abutments and brick work, rack plates on off side |
165 |
Mill Lane Bridge |
Banbury |
L/B (OS map 1920) Replaced by fixed bridge |
163 |
Marsh Bridge |
Banbury |
Narrows, abutments and brick work, rack plates on off side. Replaced by fixed foot bridge. |
162 |
Andys Bridge |
Banbury |
No remaining evidence. Removed when Hennef Way re-aligned |
151 |
Cropredy Lock Narrows |
Cropredy |
Narrows, abutments and brick works. |
Many of these lost bridges have interesting stories:
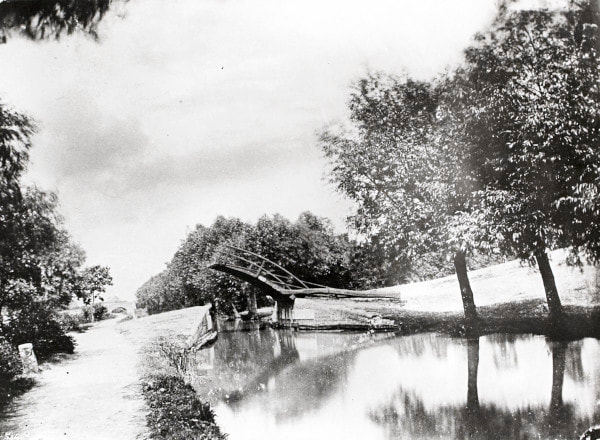
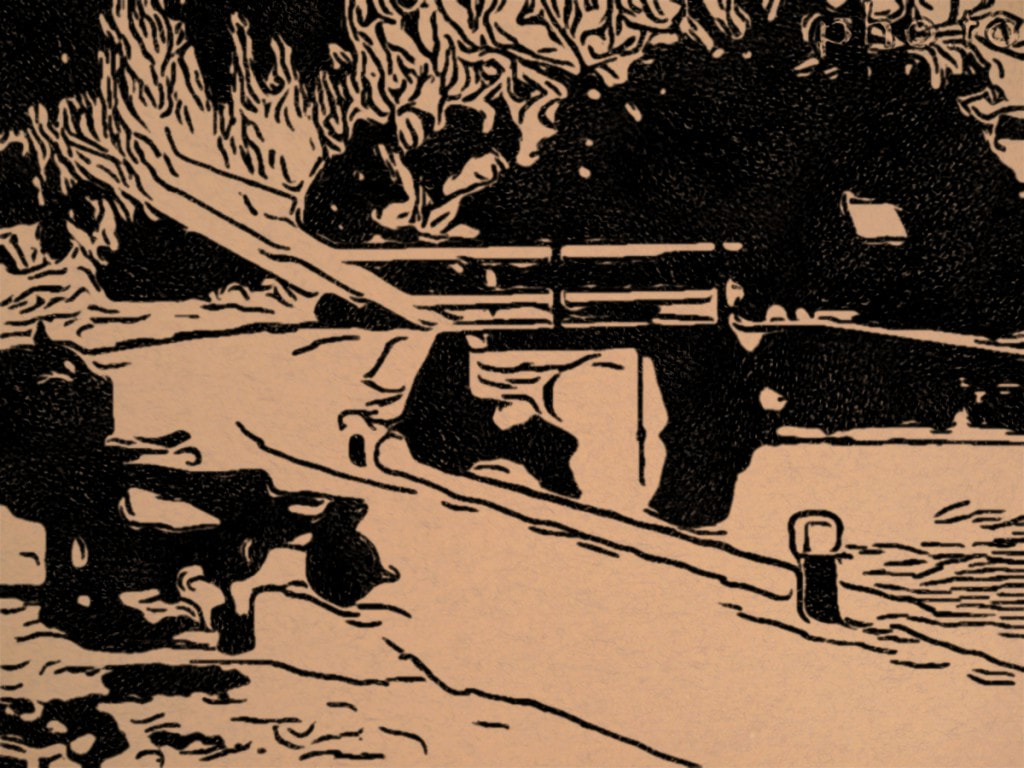
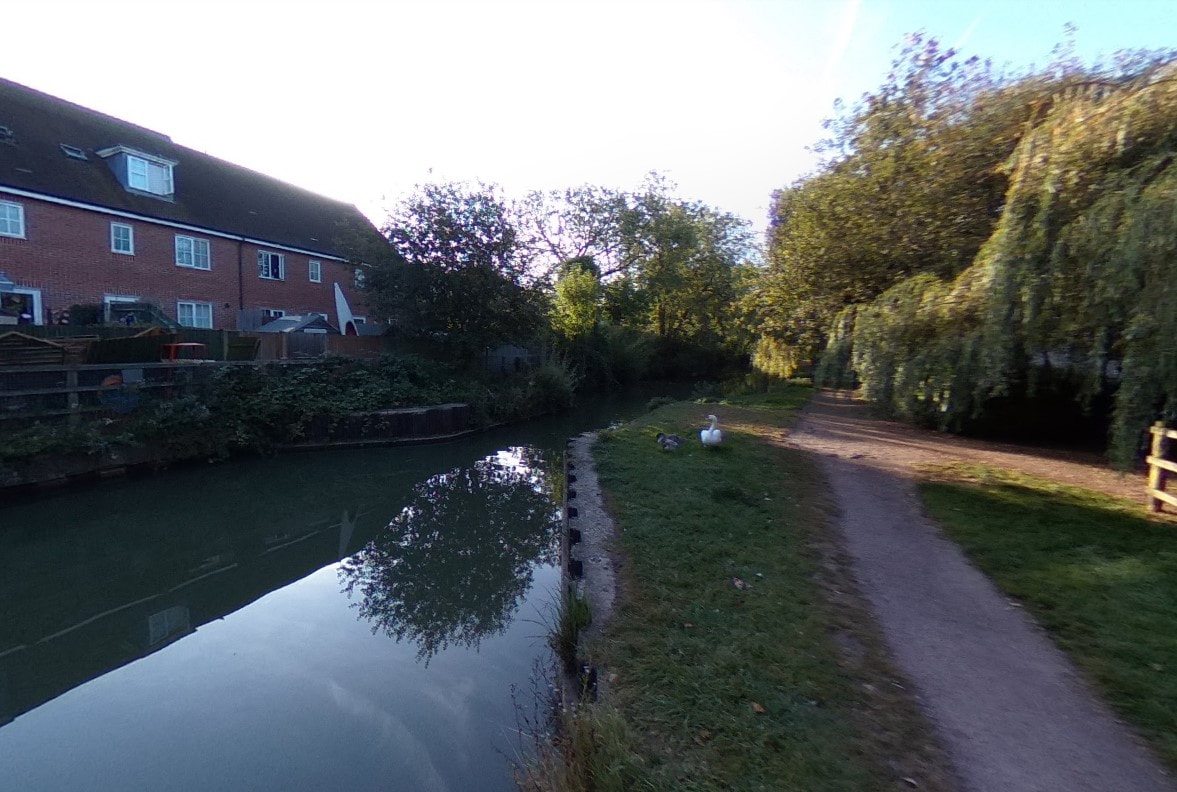
Bridge 241: Photographed in 1868 showing an early form lift bridge in a rural setting. Image supplied by National Waterways Archive, Canal and River Trust. (R1556)
Site of Bridge 241: Photographed 2019. Image- Google Maps
|
Bridge 241 Oxford
This bridge connected the area that was shortly to become North Oxford (between Park Town and Summertown) with the fields to the west of the canal. It was known as the "Workhouse Bridge" in the 19th century, possibly because of its proximity to a farm run by the Oxford Board of Guardians to supply the Oxford workhouse. Known as Pepper Hills, this farm stood on the land now occupied by the houses between Southmoor and Kingston Roads and the canal (Kingston Road was previously known as Hutt lane and led from Walton Street to Hayfield Hutt). With the Victorian expansion of Oxford into the relatively affluent northern suburbs, this link became redundant and was removed in the early 20th century. Today the only clue to its previous existence is a wooden footbridge connecting the canal towpath, across a ditch, to what is now the Aristotle Lane Recreation Ground This image from 2019 shows the appearance of the bridge site today. The open land on the off-side of the canal has become the gardens of the houses on Kingston Road, and that on the near-side a recreation ground, connected to the towpath by a wooden footbridge preserving the original lift bridge alignment. In both images Bridge 240 (Aristotle Bridge) can just be seen in the distance. |
Bridge 239A Oxford
The narrows we see here today are all that remains of a site of significant economic history.
Between the canal and Woodstock Road, on the site of an old brickworks, was situated the factory of the Osberton Radiator Company (known locally as "The Rads"). This was one of the early suppliers to the fledgling Morris Motor Company, and was bought out by William Morris in 1923 to become part of his expanding commercial empire.
As production increased, the factory expanded and an electric lift bridge was installed across the canal to give better access to the plant for heavy lorries. During the daytime, the bridge had its own dedicated bridge-keeper who would open and close the bridge (by means of an electric motor) as required, at night it was left in the open position.
During the second world war the factory produced radiators for Spitfires, Hurricanes and Lancaster aircraft, and after hostilities ceased it returned to automotive component manufacture until 2001 as part of the Unipart group.
Since the closure of the factory in 2001, the Waterways housing development now occupies the site.
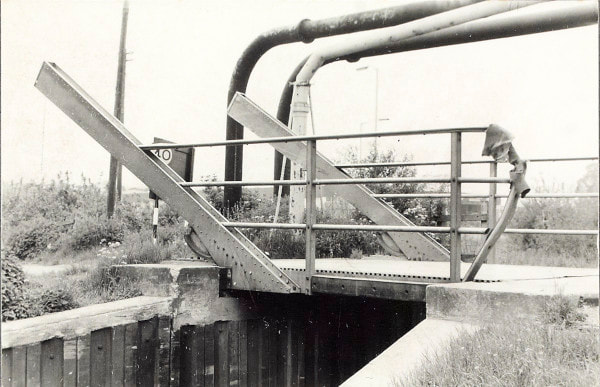
Bridge 162 in 1971: The traditional lift bridge replaced by a unique aluminium structure. Image supplied by National Waterways Archive, Canal and River Trust (BW200/1/72/63(1))
|
Bridge 162 Andy's Lift Bridge, Banbury
Originally built as a standard lift bridge beside Grimsbury Wharf, on the road to the north of Banbury, it later gave access to the new water works built by Banbury Corporation to serve the needs of the expanding town. In 1931, the Northern Aluminium Company (latterly Alcan) opened an aluminium plant on nearby Southam Road, and this rapidly expanded into an important sheet aluminium producing site supplying important components for Spitfires during world war II. At some point after the war (probably in the 1950s/60s), the lift bridge was replaced by a new structure largely fabricated from aluminium produced in the local Alcan plant. This unique bridge became redundant with the development of the new Hennef Way interchange and subsequent re-alignment of the canal. Instead of being scrapped, the bridges historic significance was recognised and it survived to be reused in a new location at the junction of the Kennet and Avon Canal and a newly re-opened section of the Somerset Coal canal at Monkton Combe (Somerset) |
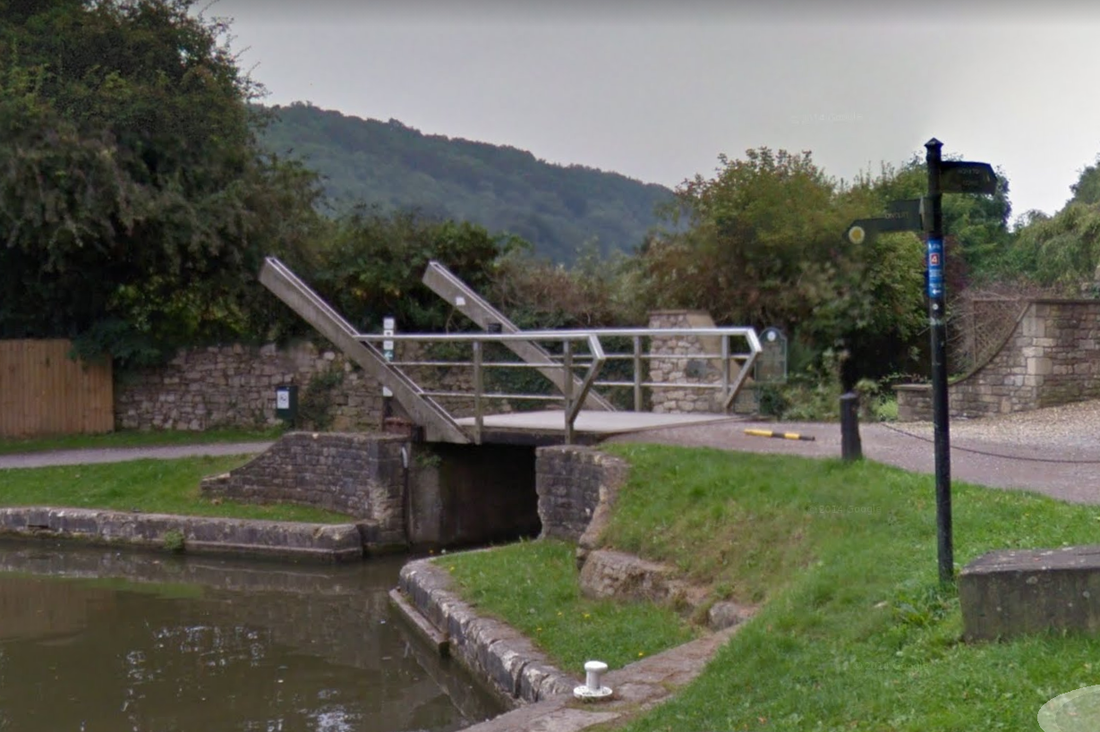
Image: Google Maps
|
The relocated Bridge 162. Spanning the entrance to the Somerset Coal Canal at its junction with the Kennet and Avon Canal at the evocatively named "Brass Knocker Basin". This unique aluminium lift bridge continues to "bridge the gap" in its new home. |
Lift Bridge Locations : Historical Relevance
If we look at the geographical distribution of all the lift bridge sites on the Oxford Canal (see map above), two interesting features are apparent:
1. The majority of sites are confined to two major groupings
- A southern group from Oxford, through Kidlington and Shipton to Enslow (14 sites)
- A northern group from Adderbury northwards to Banbury (19 sites)
2. There are only four sites north of central Banbury.
This clustering can probably be explained by the rural nature of the central area between Oxford and Banbury, with relatively few settlements connected by ancient rights of way and trackways. Presumably this lack of lift bridge sites also reflects the fact that only a small number of farms and estates were divided by the canal. The usual stone and brick built bridges are found on crossings with more "traffic".
The finding of any lift bridge site north of Banbury town centre is, according to conventional theory, a problem.
The construction of the Oxford Canal reached Banbury in 1778, but further progress was not possible due to a lack of working capital. After an interruption of eight years a parliamentary Act was passed in 1786 to re-finance the Oxford Canal Company and progress towards Oxford could resume. However the financial position of the company was still difficult and construction costs were pared back as much as possible. This resulted in the use of single gate locks and using lift bridges as cheap alternatives to double gate locks and fixed bridges of stone or brick.
As such, we would expect to see lift bridges on the section of canal built after 1786 (Banbury to Oxford), but not on the section built prior to the hiatus of 1778-86 (i.e. north of Banbury). The majority of lift bridges fit neatly into this narrative, but the four north of Banbury town centre are an anomaly.
So how can we explain this? There are two potential explanations.
1. By 1778, it is quite likely that the financial resources of the canal company were already stretched, leading to cost reduction measures, which may have included the use of lift bridges on the final stretch of the canal into Banbury.
2. Alternatively, these lift bridges could be later additions to the canal (after 1786) when the use of these cheaper alternative crossings was already common practice.
At this distance in time it is difficult to discern which of these possibilities is the correct explanation.
Conclusion
The lift bridges of the southern Oxford Canal are a unique legacy; the product of financial constraints experienced by the Oxford Canal Company during the later part of the 18th century. They have a bucolic appearance which extends even into the heart of Oxfordshire's largest urban areas, and tell stories which can inform and delight in equal measures.
Back to: Oxford Canal Bridges (Introduction) Stone Bridges Brick Bridges
Forward to: Iron Bridges Railway Bridges Sources and Further reading
